How to use Compiz in Xubuntu (w/ Xfce) 14.10, 14.04 or 12.04
2014-11-23 08:53:41
0
category: linux
1. Install Compiz, the main Compiz plugins, CompizConfig Settings Manager and Metacity:
sudo apt-get install compiz compiz-plugins compizconfig-settings-manager metacity2. You'll also need a tool to change the window titlebar theme (since Metacity will be used). To keep things light and without the need to add any PPAs, we'll use dconf-editor / gconf-editor in the steps below.
For Xubuntu 14.04 or 14.10, install dconf-tools:
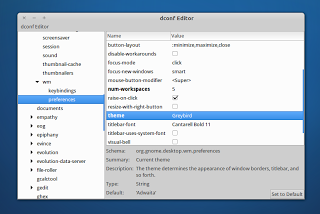
sudo apt-get install dconf-toolsThen press ALT + F2 and run: "dconf-editor", navigate to org > gnome > desktop > vm > preferences and change the "theme" value from "Adwaita" to "Greybird". Remember this because in the same place you can also change the window button layout, among others.
Here, you may also want to change the "titlebar-font" value from "Cantarell Bold 11" to "Droid Sans Bold 9" or else the window titlebar font might look way too big.
Here, you may also want to change the "titlebar-font" value from "Cantarell Bold 11" to "Droid Sans Bold 9" or else the window titlebar font might look way too big.
For Xubuntu 12.04, install gconf-editor:
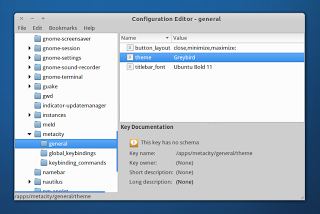
sudo apt-get install gconf-editorThen press ALT + F2 and run: "gconf-editor", navigate to apps > metacity > general and set the "theme" value to "Greybird" (assuming that Greybird theme is installed - and it should since it's the default theme).
Whenever you want to change the Xubuntu window theme, you'll have to use dconf-editor / gconf-editor like explained above.
3. Some Compiz plugins MUST be enabled before running Compiz:
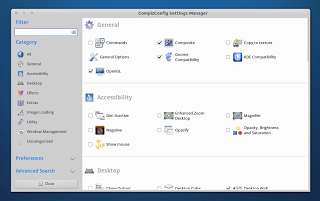
Open CompizConfig Settings Manager via Xubuntu's Settings Manager and activate the Window Decorations plugin.
If no other plugins are enabled, you'll have to enable the following plugins (without these plugins enabled, Compiz won't work properly): Composite, Gnome Compatibility, OpenGL, Window Decoration, Move Window, Resize Window, Place Windows.
If no other plugins are enabled, you'll have to enable the following plugins (without these plugins enabled, Compiz won't work properly): Composite, Gnome Compatibility, OpenGL, Window Decoration, Move Window, Resize Window, Place Windows.
I also suggest enabling these plugins: Expo, Desktop Wall (or Cube), Application Switcher (or Static Application Switcher / Ring Swithcher), Grid and of course, enable any other plugins you like (don't enable the Unity plugin though!).
You can enable/disable more plugins later on, but the important part is to enable the plugins required for Compiz to work properly, which I've mentioned above, before running Compiz for the first time.
You can enable/disable more plugins later on, but the important part is to enable the plugins required for Compiz to work properly, which I've mentioned above, before running Compiz for the first time.
4. Let's start Compiz using the following command:
compiz --replace5. Set Compiz as default in Xubuntu / Xfce
At this point, Compiz is up and running but it won't be used after a system restart. So if you're satisfied with it, add it start when you login to your Xubuntu session.
To do this, run the following commands (use "mousepad", "leafpad" or whatever text editor you use for the second command and for all commands from now on that start with "mousepad"):
In the newly opened file in Mousepad (or some other text editor), look for the following bolded line (should be on line 12 in Xubuntu 14.04):
If later on you want to go back to using Xfwm4 instead of Compiz, open the same file again:
Another way to do this is to (this is not the 100% proper way to do it, but I've added it in case the above method doesn't work for you): open Settings Manager > Session and Startup and on the Application Autostart tab, click "Add", under "Name" enter "Compiz" and under "Command", enter "compiz --replace" (both without quotes). You can leave the description field empty.
To do this, run the following commands (use "mousepad", "leafpad" or whatever text editor you use for the second command and for all commands from now on that start with "mousepad"):
cp /etc/xdg/xfce4/xfconf/xfce-perchannel-xml/xfce4-session.xml ~/.config/xfce4/xfconf/xfce-perchannel-xml/xfce4-session.xmlmousepad ~/.config/xfce4/xfconf/xfce-perchannel-xml/xfce4-session.xmlIn the newly opened file in Mousepad (or some other text editor), look for the following bolded line (should be on line 12 in Xubuntu 14.04):
<property name="Failsafe" type="empty"> <property name="IsFailsafe" type="bool" value="true"/> <property name="Count" type="int" value="5"/> <property name="Client0_Command" type="array"> <value type="string" value="xfwm4"/> </property>If later on you want to go back to using Xfwm4 instead of Compiz, open the same file again:
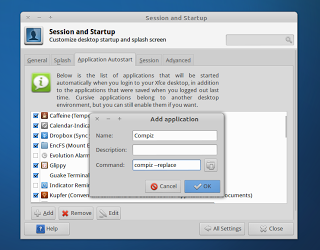
mousepad ~/.config/xfce4/xfconf/xfce-perchannel-xml/xfce4-session.xmlAnother way to do this is to (this is not the 100% proper way to do it, but I've added it in case the above method doesn't work for you): open Settings Manager > Session and Startup and on the Application Autostart tab, click "Add", under "Name" enter "Compiz" and under "Command", enter "compiz --replace" (both without quotes). You can leave the description field empty.
If later on you don't want to use Compiz any more, simply remove Compiz from Settings Manager > Session and Startup > Applications Autostart tab, then log out and log back in.


